


Recovery Gear Care: How to Disassemble and Reassemble your Snatch Block
Posted by Chris Jurden on
Snatch Block Maintenance: A Little Care Goes a Long Way
We are off-roaders. Everything gets dirty. Whether you are in the desert dust, forest mud or snowy mountains, you can count on dirt, grit and grime getting all over your Recovery Gear. Here at GearAmerica, we offer a Lifetime Warranty on everything we make, so you know it's built right, but cleaning and maintaining your gear makes it work perfectly for ages. One of the only pieces of gear with moving parts is the Snatch Block. Let's walk through the disassemble process for when it gets REALLY dirty!

It's So Simple!
All GearAmerica Snatch Blocks consist of a few simple parts. The 9 Ton (pictured) has the following:
- Side Plate (2)
- Main Pulley (or sheave)
- Center Pin (sheave pin)
- Zerk Fitting
- Retainer Clip (2)
These parts combine create a heavy-duty simple machine that give you a mechanical advantage when winching. SO what do you do if it gets completely saturated in mud? Let break it down! Grab some c-clip pliers and a 7mm socket or driver, and let's get started.
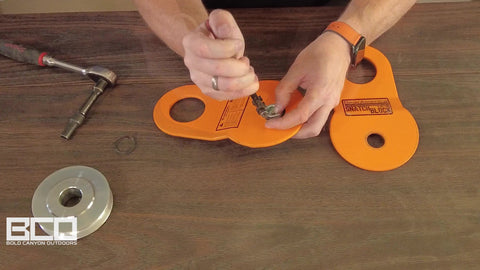
Step 1: Remove C-clip
Using c-clip pliers, gently remove the outer retainer clip (sometimes called a c-clip or circlip). Keep an extra finger on it, because it is under spring tension and tends to go flying across the room if it pops loose. Set the clip aside.

Step 2: Side Plate Removal
With the retainer clip removed, lift the side plate off the main pin, or sheave pin. This will expose the pulley. clean the side plate and set it aside. All parts can be wiped down with a rag or washed in soapy water as needed.

Step 3: Remove the Main Pulley
With the side plate set aside, you have direct access to the main pulley, or sheave. Lift it off of the sheave pin, and take a look.


Step 4: Remove the Second Retainer Clip
The GearAmerica 9-Ton Snatch Block has retainer clips on both sides. Our other snatch blocks only have the clip on one side. Remove the second clip. Remember, be careful not to let the clip fly away.
Step 5: Center Pin (sheave pin) Removal
With the second clip removed, you can slide off the other side plate, freeing up the center pin, or sheave pin. The GearAmerica Sheave Pin has a hollow cavity that can be filled with grease. The pin has a channel on it's center belt line that hold the grease and allows the pulley to ride effortlessly on the pin.

Step 6: Zerk Fitting Removal
Using a 7mm socket or driver, remove the zerk fitting on the end of the sheave pin. It should come out easily, and should not be forced or over tightened.

Step 7: Examine and Clean
Now is the time to clean and examine the parts of your Snatch Block. Clean both plates, retainer clips and center pin. If needed, use an air compressor and blow out the interior cavity of the pin of any extra old grease, mud or water.

Check the pulley for any marring or burrs cause from rocks, worn cables etc. Examine the pulley on all side and if needed, use fine grid sandpaper or a file to remove any burrs or marks. This will ensure a long life for your Snatch Block AND your winch line!

Step 8: Reassemble and grease!
With your parts clean and dry, reassemble in the reverse order as shown above. DON'T FORGET...be gentle with the zerk fitting, and don't over tighten. Once assembled, use a grease gun and pump some grease into the zerk fitting. You won't see the grease flow out, so one pump from a standard grease gun will suffice.
Step 9: GO PLAY!
Now that your Snatch Block is cleaned and lubed, it's time to go out and explore our wild spaces! Have fun, and be confident knowing that your GearAmerica Recovery Gear is the toughest out there, is well maintained, and carries the best warranty in the business...LIFETIME!
Have fun out there, and as always, Off-Road Smart, and Tread Lightly!

Share this post
- Tags: 4x4, Accessories, basics, beating, blog post, blogs, care, clean your gear, Essentials, forums, forums and blogs, GearAmerica, grease, jeep, jeep wrangler, lube, maintenance, off-road, Off-Roading, pin, pulley, recovery, recovery gear 101, recovery gear cleaning, recovery gear maintenance, recovery safety, safety, sheave pin, snatch block, Tips, Tools, vehicle recovery, winching, zerk, zerk fitting